4 ingredients Chocolate Fudge recipe for fulfilling your midnight sweet cravings .
Simple and Easy to make 🙂

4 ingredients Chocolate Fudge recipe for fulfilling your midnight sweet cravings .
Simple and Easy to make 🙂
December comes every year and comes with it the celebrations! The lights the merriment the gifts and the whole town being lit up for Christmas and New Year’s Eve. The joy just multiplies with each passing day. But, the carousing ain’t limited to these two major events, instead for some the reason is the new beginning of the ‘knotty affair’. Yes, December also comes with a lot of ‘Save the Date’ wedding invites.
Weddings are beautiful, traditional, happiest time for the bride and the groom, time for festivities but it also brings along a big checklist for the prep of the big day. Anybody and everybody will be there to help, advice, point out things to put down in the check list. The venue, wardrobe, invites, event planner and the cakes tasting.
Everything else is okay. But have you ever wondered why such a fuss about the cake. I mean the wedding an do pretty well without the cake, Right!? I thought that for the longest time until I came across the tradition behind the ‘Cake Cutting’ at weddings.
Through the years, the wedding cake has become the focus of a variety of customs and traditions. Some of these customs have survived through time. Some have not.
In the 17th century and well untill the early 19th century there was a popular dish called the Bride’s pie. The pie was filled with sweet breads, a mince pie, or may have been merely a simple mutton pie. A main “ingredient” was a glass ring. An old adage claimed that the woman who found the ring would be the next to be married. Bride’s pies were by no means universally found at weddings, but there are accounts of these pies being made into the main centerpiece at less affluent ceremonies.
By the late 19th century, wedding cakes became very popular, and the use of the bride’s pie disappeared and instead came the tradition of baking wheat and salt into small cakes to be eaten. During the ceremony the groom would eat part of a loaf of this barley bread and then he would break the rest over his bride’s head. This was taken as a sign of good fortune and a blessing for long life and many children
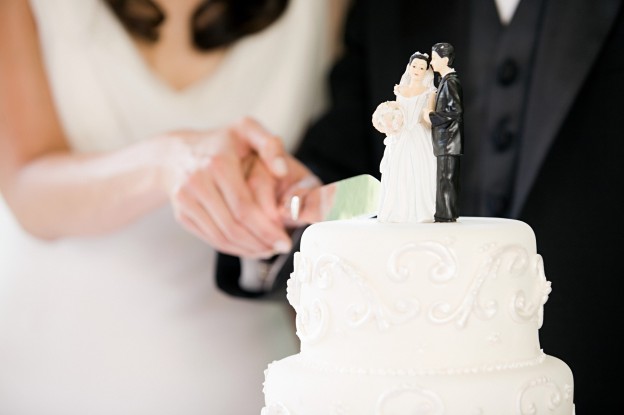
Wedding cakes take centre stage in the traditional cake cutting ceremony. In addition to providing a great photo opportunity, it is symbolic as the first task the newlyweds execute together. The first piece of cake is cut by the bride with the “help” of the groom. The practice of the bride and groom cutting the cake together was born of pure necessity. As cakes went from simple pastries to elaborate, multi-tiered extravaganzas, it became virtually impossible for the bride to cut the cake alone. She needed her new husband’s muscle to help cut through the stiff layers of frosting. While today’s wedding cakes have become much easier to maneuver, the bride and groom still cut the cake together simply for the love of tradition.
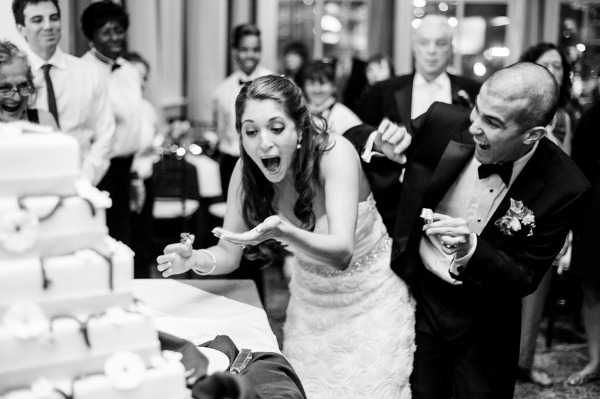
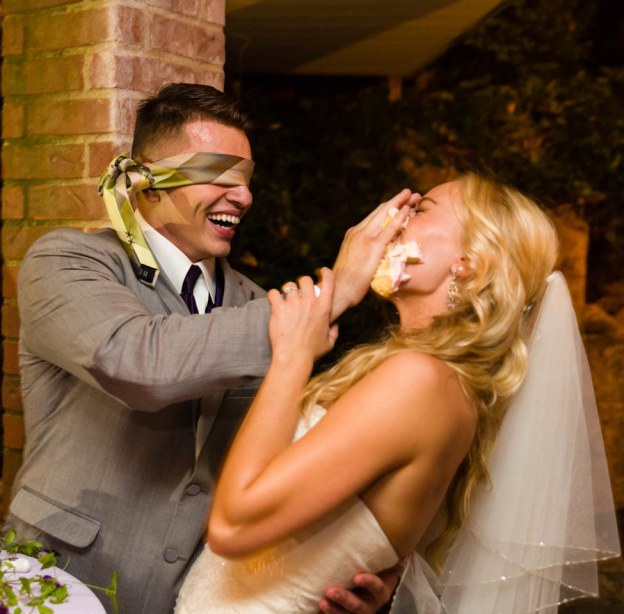
After the cake is cut, the couple proceed to ‘feed one other’ from the first slice. This provides another lovely piece of symbolism, the mutual commitment of bride and bridegroom to provide for one another, to ‘feed’ each other physically, spiritually and mentally.
In the minds of most people, wedding cakes are supposed to be white. The symbolism attached to the color white, makes explaining this tradition

rather simple. White has always denoted purity, and it relates to white wedding cake icing that first appeared in Victorian times. Another way in which a white wedding cake relates to the symbol of purity, has its basis in the fact that the wedding cake was originally referred to as the bride’s cake. This not only highlighted the bride as the central figure of the wedding, but also created a visual link between the bride and the cake. Today, that link is being further strengthened as more contemporary brides have contemporary wedding cakes co-ordinated with their wedding gown color, even if it’s not white! Previous to Victorian times, most wedding cakes were also white, but not because of the sy mbolism.
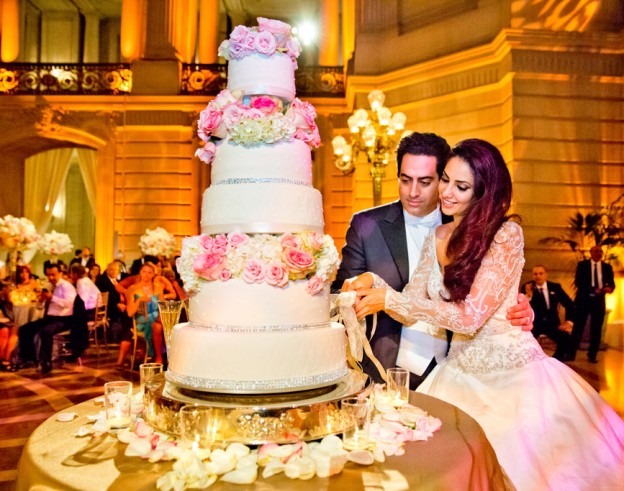
The once simple wedding cake has evolved into what today is a multi-tiered extravaganza. The multi-tiered wedding cake was originally reserved for English royalty. Even for the nobility, the first multi-tiered wedding cakes were real in appearance only. Their upper layers were mockups made of spun sugar. Once the problem of preventing the upper layers from collapsing into the lower layers was solved, a real multi-tiered wedding cake could be created.
So many customs and traditions, and as I said, some stayed some did not. All of these customs though are beautiful in their own way. After knowing the traditions the first bite of the wedding cake with a glass of champagne becomes all the more special.

Cooking time: 15mins
Preparation time: 70mins
Serves: 12-16
For the Swiss roll
4 large eggs, separated and at room temperature
1/4 cup icing sugar, plus extra for dusting
1 tsp vanilla extract
1/8 salt
2 tbsp sugar
2 tbsp granulated sugar
3/4 cup cake and pastry flour
2/3 cup raspberry jam
For the Bavarian cream
1 cup whole milk
1/2 vanilla pod or 1 1/2 tsp vanilla pod paste
4 large egg yolks
2/3 cup sugar
2 tbsp gelatine powder
1 1/2 cups whipping cream
Method
Preheat the oven to 175°C. Line the bottom of a 15-x-10-inch Swiss roll tin with parchment paper.
Place the egg yolks and icing sugar in a large bowl or in the bowl of a stand mixer fitted with the whip attachment and whip until the yolks have doubled in volume and hold a ribbon when the whip is lifted, about 4 minutes. Whip in the vanilla.
In a separate, or cleaned bowl, whip the egg whites with the salt first on low speed until foamy, then increase the speed to high and pour in the granulated sugar, whipping until the whites hold a medium peak.
Sift half of the flour into the yolk mixture and fold in using a whisk, then fold in half of the whipped egg whites. Repeat with the remaining flour, and then change to a spatula to fold in the last of the whites until evenly incorporated. Spread the batter into the prepared pan, taking the time to ensure the batter is level.
Bake the cake for about 12 minutes, until the cake springs back when gently pressed in the centre. Let the cake cool for about 2 minutes on a cooling rack, then loosen the sides with a spatula. Sift a layer of icing sugar over the surface of the cake and cover with a clean tea towel. Place a second cake pan over the towel and quickly invert the cake, removing the pan it was baked in. Peel off the parchment paper and dust this surface with icing sugar. Roll the cake up from the 10-inch side with the towel and let it cool completely (cooling it rolled sets its “memory” so the cake won’t crack once filled).
Stir the raspberry jam to soften. Unroll the cake and spread an even layer of jam over the cake. Roll the cake back up again, dust the top with icing sugar. Cover and store at room temperature until ready to serve.
The cake can be prepared up to a day in advance and stored, wrapped and unrefrigerated.
Bring the milk up to a simmer along with the scraped seeds from the vanilla bean (or the vanilla bean paste, if using). In a separate bowl, whisk the egg yolks and sugar. Slowly pour the hot milk into the yolks while whisking constantly, then return the entire mixture to the pot. Cook the custard over medium heat, stirring constantly with a wooden spoon, until the mixture thickens and coats the back of the spoon, about 4 minutes. Strain the custard into a bowl.
Stir the gelatin with 1/3 cup of cool water and let it soften for a minute. Whisk this into the custard while it is still hot. Cool the custard completely to room temperature, then chill the custard for about 15 minutes, so that it is cool to the touch but not setting.
Whip the cream to soft peaks and fold this (using a whisk) into the cool custard mixture. Assemble the charlotte while the custard is still fluid.
Line a 6-cup bowl or charlotte mold with plastic wrap. Slice the Swiss roll into ½ inch slices and line the entire bowl, pressing the jell roll slices together as tightly as possible without altering their shape. Pour the Bavarian cream into the mold and place any remaining jelly roll slices on top. Cover the charlotte with plastic and chill for at least 4 hours to set.
To serve, invert the charlotte onto the serving plate and peel away the plastic wrap. Slice into wedges to serve.

Cakes are old. Very very old.
The Greeks and Romans relished cake back in their day. Cakes are that old. In fact, if you go back far enough, the line between bread and cake becomes blurred. Proper separation of the categories ‘cake’ and ‘bread’ didn’t come until the Middle Ages. Perhaps it’s just me, but a world where cake is not immediately and easily identifiable is truly an alien one.
Some claim that it was in ancient Greece where birthday cake became a thing. Others say birthday cake didn’t come around until Germany during the Middle Ages, and was mostly enjoyed during kinderfests, or birthday celebrations of small children. From there, England adds small figurines or candles to their birthday cakes, leading to the current tradition of a song, a strong exhalation, and a wish. And then the cutting of the cake, of course.
Another famous old guy, Chaucer, mentioned large cakes used as commemoration of special occasions.

It’s apparent, then, that cake has been the go-to celebratory dessert of the English-speaking world for some time now. But the cakes made in the 1400s would probably be barely recognizable as such to our modern eyes. The form and ingredients that went into medieval cakes, as well as the baking process, have changed drastically. Perhaps the greatest shift in cake came about during the Industrial Revolution.

Today, the proliferation of cake shapes, forms, and ingredients used
means that we get to enjoy whatever
kind of cake tickles our
fancy. As I pointed out with weddings and birthdays, tradition need no longer shackle us to a specific type of cake. The 21st century has provided for us all Cake Freedom, and the dessert continues to evolve in fun and exciting new ways.

Being a Dessert person baking perfect cookies was never my cup of tea , there were always one issue or the other 😦 But recently a student of mine who is an expert in baking cookies and breads introduced me to a simple but perfect recipe of Eggless Chocochips cookies. Trust me this recipe has helped me to over come my fear of baking perfect cookies 🙂

Chocochip cookies ingredients :
Cake margarine 30gms ,Yellow butter 30gms, Powder sugar 35gms, Milk powder 10gms, Maida 70gms,
Baking powder 1/4tsp, Cocoa powder 10gms, Chocolate chips 20gms, Milk 30ml, 45% dark chocolate 30gms
Method:
Beat butter and powdered sugar for about 2 min. Then add margarine ,milk powder , cocoa powder in the butter and mix well . Add the remaining mixture with melted chocolate and mix well . Make small balls about 18 to 20 gms and put them in a baking tin which is lined with parchment paper .
Enjoy your cookies with a hot cup of tea or coffee 🙂

“The grass is always greener on the other side.” This phrase suits perfectly to debate on Freelancing or a Regular full time job
It has been 3 years since, I have been a freelancer and I could not be any more happier with my decision. But taking a jump from a Regular paid job to being a Home Baker was not easy.
Cons:
1) Convincing family was the toughest part. (they still think I’m making a mistake).
2) From having a particular monthly amount in my account , which made
it easier for me to spend money every month. (You always know that your bank account will have money next month) and now I have to keep a track of my expenses, and my sales, with hardly any salary for me to spend. (Forget saving!)
3) Working from home makes your family thinks that your available anytime to do other household work.
4) Calling up (I would even call it begging) people to give you some work or working day and night to get an order, if you get an order your still scared if the order gets cancelled or if you can live upto their expectations.
6) Clients think that we can work for free or a less pay (We work equally hard, in fact really hard)
7) Motivating yourself (tough one) you need to push yourself harder every morning to get out of the bed.
8) Making a routine; nitially making a routine was tough for me, but finally realised these is no other way.
Pros:
1) You’re happy: No more Boss criticism or waiting for him to appreciate your work. A happy compliment from your client makes your day.
2) You can make time for yourself , focus on your health or things you love (Most of my corporate friends envy me for the time I get to spend on myself)
3) You can wake up any time , sleep anytime. (This works well after finishing an assignment)
4) Planning a holiday. (You don’t have to think twice, or check your work calendar or apply for leaves, you are all set with you bags packed. “Parents” Yes, they will be ready with questions…)
Most times when I sit idle for sometime, sipping my cup of tea, I think to myself whether I should go back to my old regular job, and then I thought comes to me that I would not have even had this time to think what I have now while enjoying my cup of tea. 😉
All I know is that “Rome was not built in a day ”

One of my client’s had made a request for cupcakes with traditional indian flavours. After some tasting, the pista flavor was finalised. The pista flavouring makes the cupcake really stand out.
Ingredients:
Method:

Chai is my daily energy booster. Seeing my addiction towards tea, my friend suggested me to add tea in the cupcake batter. The result was amazing !! The subtle flavours of chai make the cupcakes really soothing.
Ingredients :
200g of condensed milk
125 ml of chai made with milk without sugar.
100g butter
15g castor sugar
1/2 tsp cardamon powder
1/2 tsp of crushed ginger
125gms flour
1/2tsp baking soda
1 tsp baking powder.
Method :
Whisk together butter and sugar till light and fluffy. Add condensed milk and chai and whisk till mixed well. Add in cardamon powder and ginger in the mixture.
Shift in flour , baking powder and baking soda and fold into the batter. Bake at 180c for 20 to 25 min. Pour the batter in a lined cake tin .

Having sudden guest at home and don’t know what to make for dessert, Oreo truffles are your answer.
These creamy Oreo truffles can be made within 15min.
Ingredients:
1) 150 gms Oreos
2) 76 Gms cream cheese
3) 150 Gms dark chocolate
If you don’t have Oreos at home you can use any other biscuits.
Method:
Break the Oreos into tiny pieces. Beat the cream cheese till it is light. Add crushed Oreos to the cream cheese and mix then together. Once the mixture is well mixed make round balls out of the mixture and freeze it for 5min.
Melt the chocolate in the microwave. Remove the Oreo from the freeze and dip it in the melted chocolate.
Let the Oreos cool for 10 min in the freezer and then enjoy the Oreos .

Being a dog lover and a baker, I always wanted to prepare some treats for them, so they could enjoy a cake all by themselves (No more giving a tiny piece to them) Did a little research and made a recipe which was a hit with my dog. Ingredients: 1 ) 2 cups wheat flour or oats flour 2) 2 tsp honey 3) 1 tsp baking powder 4) 2 eggs 5)add 1/2 cup grated carrot or peanut butter or oats. 6) water 1/2 cup Recipe: Beat eggs one at a time . Add flour , honey , baking powder and carrot or peanut butter or oats . After the mixture is mixed well add water and pour the batter in a tin or a dog bone shaped tin. Bake for 30 min at 180 degrees.  Now u can Celebrate your dogs birthday with a cake he/she loves😄
